Tamron Tele-Macro Lens – Part 2

Quite frankly, I was so interested in getting a good telephoto lens, I essentially overlooked the macro features of the Tamron 70-300 Telephoto/Macro lens. On my daily walk around the yard, I discovered a small (less than one-inch body length) green tree frog resting on the leaf of a lily. Finally, the “macro” feature of the lens came to mind.

It took a few minutes to determine how to switch to macro mode, and it was immediately obvious that I would need a tripod to steady the lens/camera combination.

The little green tree frog was my first subject. The first photo is maximum magnification by the camera and lens. The second is a cropped version of the photo to look at the detail captured by the lens.

DSC_0483 (900x602)

Green Tree Frog Resting on Lily Leaf (Original Photo)

DSC_0484 (900x603)

Same Photo as Above Cropped to Enlarge the Tree Frog

Next to the lily, there is a bed of pink and blue Vinca that attracts many small butterflies. One of the butterflies posed cooperatively for me as I adjusted the camera and tripod for its portrait.

Again, there are two photos as above.The first is the full image captured by the camera, while the second has been cropped for composition and increased detail.

DSC_0485 (900x602)

Butterfly on Vinca Blossom – Original Photo as taken by Camera

DSC_0486 (900x603)

Cropped Version of Photo Above. Note Clear View of Proboscis Penetrating the Center of the Blossom for Nectar

I have been wanting to experiment with macro photography, and while this is not a traditional macro lens, the Tamron 70-300 Telephoto/Macro lens is delivering functional macro capability.

If anyone recognizes the butterfly, please leave a comment.

Posted in Natural History, Photo of the Week | Tagged , , , , , , , , | 2 Comments

Four Good Beaches For a Week on Oahu, Hawaii

I don’t know how many different beaches there are around the island of Oahu, but based on a quick glance at my map, there must be at least two dozen, from small, intimate beaches tucked in inlets and coves to larger beaches like Waikiki. In six days, we visited four beaches spending between two hours and “most of the day.”

There were four of us in “our crew,” and each of us has our own idea of the perfect beach. I am not a strong swimmer nor am I a surfer. My academic major was biology, and I prefer wild beaches with tide pools, rocky outcrops, small islands, etc., to explore for beach life. My wife loves the surf and swimming. One passion we all share is photography.

During our week in Hawaii, we were able to visit four beaches—each one distinctly different

Our traveling companions—my sister-in-law Karen, and her husband Dustin, were celebrating their 40th anniversary. They are both accomplished videographers with their own YouTube channel, Boomer’s Outdoors.

Waikiki Beach

Waikiki Beach is located near one of the busier tourist areas near many hotels and restaurants. Standing on the beach looking back at the shoreline, central Honolulu is to the left and Diamond Head crater is on the right.

Hotels and Diamond Head seen from Waikiki Beach.

Waikiki Beach is wide with a very gentle slope seaward. When the tide is out, you can walk 100 yards or more to the surf, at least in some areas. You can lounge on the beach, swim, surf, hunt for shells or just people-watch. There are a variety of concessions along the beach, and there are several major hotels that open onto the beach so you can slip inside for lunch or shopping. Waikiki is on the east side of the island, so get up early one morning and head to the beach—sunrise is almost always a treat. If early mornings aren’t your thing, Waikiki is active well into the night.

Sunrise from Waikiki Beach

Waikiki Beach Brief Video

Makapu’u Beach Park

Makapu’u Beach Park was the first beach we encountered traveling east along Highway 72 east out of Honolulu. There are other secluded beaches along the way, but Makapu’u was the first we saw from the highway

Makapu’u Beach Park offers a mix of pristine white sands and rugged lava tide pools as well as a secluded beach area (not shown).

A paved parking area high above the beach provided excellent views. There are several paths down to either a secluded sandy beach or a broad open tidal beach consisting of beach sand and a broad area of ancient, tide-worn lava that created many tide pools for exploring where lava and sea collide.

Makapu’u Beach viewed from the parking area

Makapu’u is an interesting beach that offers swimming, fishing, kayaking, beach combing and exploration—with some rock climbing thrown in—or just relaxing. The park also has a nicely equipped picnic area. While we were there, we saw that people had set up small tents and other sun shelters on the beach, apparently planning to stay for a while.

Rock Climbing with Surf – Makapu’u Beach Park

Not far from the beach, on the seaward side of the steep hill just south of the beach is the Makapu’u lighthouse. This is the eastern most point of Oahu. Access to the lighthouse is via a road off of Rt 72 near Kaloko Beach and then a hiking trail from a parking area. The hike to the lighthouse is about a two-mile round trip. Note: the lighthouse itself is not open to the public.

Makapu’u Lighthouse: Source: Tripadvisorhttp://Makapu’u Lighthouse

Overall, we recommend the drive to Makapu’u as it takes you along one of Oahu’s most scenic stretches of highway winding along Koko Head Crater—a black lava mountain.

LaniKai Beach  Park

For our second day of beach exploring, Karen and Dustin had identified LaniKai, a beach farther up the east coast. We took coastal Rt 72 out of Honolulu north to Kailua Drive. From that point, we recommend either a good local map, Google Maps, or a GPS for detailed driving directions. Your destination is LaniKai Beach, a long sand beach that runs between La’ie and Kalani Points. Swimming is good here during the summer. In the wintertime when the surf is up, be alert for strong currents.


LaniKai Beach Park is a beautiful spot on Oahu’s eastern (windward) shoreline. Additionally, it has the perfect combination of powder-soft sand and turquoise-blue waters. This park is an excellent beach for water sports, including kayaking and windsurfing.

LaniKai Beach and Mokulua Islet Bird Sanctuary

The beach area is more than a mile long, so there is plenty of room even on a busy day. There was a steady flow of what I would call mild surf—waves about two feet high, ideal for amateur surfers. This is the kind of beach that you make it what you want—relax in the shade and watch, swim in the in surf or beyond the surf, surf boarding, wind surfing, and I even saw some team canoes farther away from shore.

Makaha Beach Park

Our return flight was scheduled for late afternoon, so we took a drive along the southwest side of Oahu and discovered Makaha Beach Park. This is near the western tip of the island that includes the Makua Military Reservation. There are several military or other government installations on the western tip of the island, but it appears that they are reasonably well integrated with visitor areas for hiking in the mountains.

Makaha Beach was much less crowded, probably because it is “out of the way.”

Makaha Beach is a small beach compared to the others we visited, but it is so far out on the western end of the island that few folks bother to make the trip. We spent several hours relaxing and enjoying our last beach opportunity.

There is a large outcrop of lava midway down the beach, and as the incoming tide waves rolled in, they crashed up under this outcrop and blew up through a hole in the rocky formation.

It was soon time to begin our trek home from the Paradise of Oahu .

Aloha, Hawaii.

Posted in Uncategorized | Tagged , , , , , , , | Leave a comment

4. Punchbowl Cemetery

Established in 1945, officially as the National Memorial Cemetery of the Pacific, the cemetery was established in the punch bowl-shaped crater of an extinct volcano. The crater spans six acres and is almost filled with the graves of service members who fought and died in Pacific theaters of combat, including World War II, Korea, and Vietnam.

The Rainbow that appeared seem a fitting welcome to the Punchbowl

The day we visited Punchbowl, a perfect rainbow appeared over the monuments to those missing in action

Especially noteworthy—and moving—are the ascending giant marble slabs inscribed with the names of more than 28,000 service members listed as missing in action or buried at sea. Look for bronze florets beside the names of service personnel whose remains have since been recovered and positively identified.

At the back of the memorial is a marble wall with huge mosaic images of the various battles in the Pacific. These graphics show the positions of Allied and enemy forces, and their movements. The history of the wars in the Pacific, including World War II, the Korean war, and the Vietnam conflict, are captured in these detailed panels.

Mosaic of the Battle of Iwo Jima

From January 4-March 25, 1949, more than 11,000 World War II casualties had been laid to rest in the Punchbowl crater prior to the public opening of the cemetery.

Designed to fit within the circular crater of the extinct volcano, carefully landscaped with native trees and shrubs, graves are marked by flat granite headstones meticulously placed on the expanse of the manicured grounds. The cemetery is a significant part of the country’s National Memorial Parks. (National Park Service)

Things To Know: This national cemetery is well worth visiting. While it is a solemn place, it is also a peaceful and educational experience, especially studying the detailed maps of different Pacific battlegrounds and campaigns. The “Punchbowl” cemetery is located in Central Honolulu at 2177 Puowaina Drive, Honolulu. It is open to the public. Allow several hours for your visit.

Posted in Uncategorized | Tagged , , , , | Leave a comment

3. The USS Arizona Memorial

Other than the Punchbowl Cemetery, there is, perhaps no more hallowed single place in Honolulu than the battleship Arizona memorial.

The Arizona Memorial The Turret is Visible to the Right.

The fate of the Arizona is certainly well known, having been sunk in Pearl Harbor on December 7, 1941, during the initial attack by Imperial Japanese forces, resulting in the immediate declaration of war with Japan by the United States.

Painting in the Museum depicting the Attack on the Arizona

Early in 1940, while relations between the United States and Japan had been strained by Japan’s attacks in China and other expansionist threats, the Arizona and five other battle ships were sent to Pearl Harbor to establish a strong presence and deterrence to possible Japanese aggression—but only the Arizona was actually in port that morning.

In reality, and unintentionally, it positioned Arizona and would have positioned the other ships to be perfect targets. On the morning of December 7, 1941, during the early morning attack on Pearl Harbor, one Japanese bomb struck directly into the Arizona’s ammunition magazine, causing a massive explosion that sank the ship almost immediately, killing 1,177 officers and seamen. The ship was damaged beyond recovery.

In the years following World War II, major parts of the ship were removed, but the hull was left in place, resting on the bottom with only one gun turret ring extending above the water line (at high tide).

The memorial is part of a much larger park with a museum, bookstore, and many more exhibits. The park also provides a detailed map and headset with a recording describing many displays and features of the park.

The Aircraft Carrier Carl Vinson arrived in port while we were at the memorial park.

Access to the memorial site is via a special Naval launch that makes regularly scheduled trips between the park and the Arizona. There was a waiting time for the launch to Arizona, so go early and purchase your tickets for the launch. Then use the time waiting to explore the museum, displays, and shops. There is a brief formal presentation at the memorial, plus time to scan the list of service members who died aboard the ship or who have been interred in the hull.

The Arizona is a memorial to the men who were killed during the attack, and to many of her crew members who have since died that have requested and been granted burial at sea within the sunken hull of the battleship.

While walking on the open deck of the memorial, you will likely see patches of oil appear on the water that continue to leak from the hull below. These small visible oil slicks continue to form, even 80-plus years after the vessel sank.

Things to Know: Access to the memorial is by a Navy launch that carries approximately 100 passengers out to the memorial. Inside the memorial is a marble wall with the names of the crew members killed during the bombing.

Make reservations for your visit to the Arizona Memorial as soon as you arrive at the park. When you check in for your visit, you will be provided with a map and headset that will explain what you are seeing both on the shore near the memorial and at the memorial.

There is a well-stocked gift ship for souvenirs, several buildings with displays that tell the stories of the attacks, and a separate exhibit of a submarine (an additional fee).

USS Bowfin at the Pacific Fleet Submarine Museum

If time (and energy) permit, you may also want to visit the Pacific Fleet Submarine Museum (adjacent to the Arizona Memorial grounds) and/or the Aviation Museum.

For street navigators to the park, enter “1 Arizona Memorial Place.”

Admission to the US Arizona Memorial is $89.99 for adults and $44.99 for kids (4-12). Note, there is no fee for the USS Arizona Memorial tour. Other admissions include: (1) Visitor Center Narrated Multimedia Tour, (2) Battleship Missouri Memorial – Mighty Mo Pass, (3) Pacific Fleet Submarine Museum – Admission, (4) Pearl Harbor Aviation Museum – Admission, and the (5) Pearl Harbor Virtual Reality Center. Note: I find the posting regarding admission fees somewhat confusing, especially with respect to the Arizona Memorial tour. Note, there is no separate fee for the USS Arizona Memorial tour. (Information current as of the date of this posting.)

Posted in Uncategorized | Leave a comment

2. The Polynesian Cultural Center

Five Things to Do on Your First Trip to Oahu, Hawaii – No. 2

After our visit, I was tempted to rate the Cultural Center as my favorite experience.

There are several facets to the Center. First, much of this 42-acre park includes representations of six authentic Polynesian villages including Hawaii, Fiji, Aotearoa (New Zealand), Samoa, Tahiti, and Tonga.

At each village we were able to experience elements of each culture performed by natives of that country. Each presentation takes 15-20 minutes, and all were entertaining and informative. Presentations include indigenous music, cultural demonstrations, and stories.

Entrance to the Cultural Center

First, we took a river tour through all of the villages riding in a native canoe with a native guide. Traveling by boat, barge, or canoe is common among Polynesian cultures.

For a closer look at the various cultures, we walked the village paths, surrounded by lush vegetation and tropical flowers. Experiences included musicians and native dance performances, demonstrations of different musical instruments found throughout Polynesia, and discussions of different customs and traditions of each country.

We also watched an island native climb a tall palm to harvest a coconut.

Throughout the Center there are displays and shops relating to the country you are visiting.

By the end of the afternoon, we had an appetite, and were ready for the luau, with the opportunity to indulge in as many as 20 different items including authentic Polynesian dishes such as the whole roast pig that had been prepared that day on the grounds near the luau.

As we sat down, we were treated to a (non-alcoholic) pineapple smoothie—in the pineapple—that was delicious!

I confess I did not identify or learn the names of the various dishes, except that I did get a chance to taste poi. The serve-yourself buffet included several “flavors” of poi, fish, rice, roast pork, greens with dressing.

I confess I did not identify or learn the names of the various dishes, except that I did get a chance to taste poi. The serve-yourself buffet included several “flavors” of poi, fish, rice, roast pork, greens with dressing, etc.

For dessert, there were an assortment of native confections, cakes, and several flavors of ice cream.

That evening, we moved to the theater to watch what is billed as the “most spectacular show in the islands”—the action-packed “HA: Breath of Life” drama of the days before European sailors had discovered the islands. More than 50 performers acted out a story of true cultural and personal passion—and action that concluded with fiery batons flying across the stage from every corner of the huge theater.

I assume that they change the actual story of the drama from time to time, but I am certain they always include plenty twirling and flying fiery batons.

Of course, throughout the village there are opportunities to purchase not just souvenirs, but some beautiful hand-crafted jewelry as well as beverages decorated with native flowers and flavored with tropical fruits.

Things to Know: Bring a camera! Plan an entire day, including the luau and evening performance. Prepare to be “food adventurous.” The luau will include familiar dishes—pork, fish, and vegetables, and some unfamiliar dishes including poi. There are several other more conventional places to eat as well as shops for souvenirs, jewelry, postcards, etc. Note, cameras are NOT permitted in the evening theater performance (see images here)!

There are several price packages including the basic park entrance or additional charges for ukelele lessons, the luau, and theater drama.

Click here for more information on the Polynesian Cultural Center..

During dinner, we were entertained by the current reigning queen and a reenactment of her history interpreted by a troop of extraordinarily talented performers.

That evening, we moved to the theater to watch what is billed as the “most spectacular show in the islands”—the action-packed “HA: Breath of Life” drama of the days before European sailors had discovered the islands. More than 50 performers acted out a story of true cultural and personal passion—and action that concluded with fiery batons flying across the stage from every corner of the huge theater.

I assume that they change the actual story of the drama from time to time, but I am certain they always include plenty twirling and flying fiery batons.

Of course, throughout the village there are opportunities to purchase not just souvenirs, but some beautiful hand-crafted jewelry as well as beverages decorated with native flowers and flavored with tropical fruits.

Things to Know: Bring a camera! Plan an entire day, including the luau and evening performance. Prepare to be “food adventurous.” The luau will include familiar dishes—pork, fish, and vegetables, and some unfamiliar dishes including poi. There are several other more conventional places to eat as well as shops for souvenirs, jewelry, postcards, etc.

Note, cameras are NOT permitted in the evening theater performance (see images here)!

There are several price packages including the basic park entrance or additional charges for ukelele lessons, the luau, and theater performance.

Click here for more information on the Polynesian Cultural Center..

Posted in travel, Uncategorized | Tagged , , , , , | Leave a comment

Five Things to Do on Your First Trip to Oahu, Hawaii

We recently had the opportunity to travel to Hawaii, specifically the island of Oahu. We spent several months planning, deciding where to stay and what to do. Of course, we wanted to see key features of the island, but we were on our own and were also looking forward to exploring the island away from the tourist-centric areas.

First, Oahu is a relatively small island—you can easily drive around the perimeter of the island in a day, and still get in some very enjoyable sightseeing—especially beaches. But there are several recommended “don’t miss” experiences for any first-time visitor.

I am frequently chided for an almost anal approach to planning and list making, but it served us well. We had a prioritized “must see and do” list. Note: driving around Honolulu is much like driving in any busy city. Once out of the city, it is mostly like rural driving. Before leaving, study a map for street names, routes, etc.

We were able to complete our “Oahu Bucket List” within a week, and actually add some bonus experiences. From our point of view, here are the top five things you should not miss:

A Hike up Diamond Head
Visit the Polynesian Cultural Center
Visit the USS Arizona Memorial
Visit Punch Bowl Cemetery
Hawaii Beaches

As I mentioned, Oahu is small enough that you can drive to almost any destination within 45 minutes, and usually much less. We stayed in a hotel on Waikiki Beach within walking distance of the beach and a clear view of Diamond Head Mountain. Anywhere in southeastern Honolulu is within easy walking distance of a beach. The beaches are clean, white sand, and, on almost any day you will see surfers out trying to “catch a wave.”

Here are our top five “must see” destinations. I have posted each of these experiences separately so that I can include more photos and you can read about each in smaller “chunks.”

About the Photography

My professional career has included much photography. When I first started, we used film cameras and were always worrying about the cost of film and processing. With modern digital photography, and especially with cell phone cameras, there is little need to skimp on photos. You do not want to come home as say, “I should have gotten a photo of …!”

Diamond Head from Waikiki Beach

  1. Sunrise from Diamond Head

Timing is important if you want to catch sunrise from atop the Diamond Head Crater ring. This is an extremely popular hike, and the crowds gather in the early twilight of dawn—or earlier. We arrived right at 6:00 a.m.—official opening time at the park—and started the climb in the dark. Our goal was to be at the top in time to see the sunrise over the ocean. It is an easy-to-moderate 40-minute climb to reach the top of the 760-ft. extinct volcano. Note, comfortable, well-fitting walking/hiking shoes are recommended.

The climb includes rocky paths, a tunnel, many switchbacks, sections of concrete walkway, as well as a 225-foot tunnel with steps.

By the time we were halfway up, a glimmer of morning twilight began to illuminate the trail. Near the top there are viewing areas where you can stop and look down into the crater or get a better view of the Diamond Head beach below.

At the very top of the trail, there is a beautiful view of the ocean—especially awe-inspiring during the early morning sunrise–and no two sunrises are ever alike. Once the sun is above the horizon, you will have an excellent view of beaches below as well as clear view of the Diamond Head Light House at the base of the mountain.

Sunrise from Diamond Head – No two are the same!

Linger as long as you like, but after 20 or 30 minutes, you will have seen everything there is to see, and it will be time to start back down the same path you followed climbing this craggy extinct volcano.

Lighthouse at the Foot of Diamond Head – From atop Diamond Head

Things to know: There is a $10 parking fee for autos and a hiking fee of $5.00 per person. Note that fees are collected only by credit card—no cash is accepted. You can also purchase a guided tour package that will provide transportation to Diamond Head, and a guided tour up to the summit, but we recommend the “self-guided” tour. Plan two to three hours.

If you can, be at the park at opening time—when it is still dark—so you can see the sunrise from the top of the mountain. After sunrise, there is a food truck waiting in the auto parking area that offers snacks and beverages (but no coffee!).

Next: The Polynesian Cultural Center

Posted in Uncategorized | 2 Comments

Renaissance Musings Blog Re-Launch

If you followed my blogs in the past, you would know that I have covered many topics—topics of interest to me and about which I can write with some degree of first-hand knowledge, or at least based on traditional and generally accepted sources. Also, many of my photographs have appeared here.

This particular post represents a “restart” of Renaissance Musings.

There are several “blog-worthy” events scheduled for the coming year, and I anticipate many more topics will pop up.

Where have I been the past few years—a fair question to which there is no satisfying answer. Basically, distractions include medical issues—nothing serious, but annoying and, as I said, distracting.

Upcoming Topics

There are several trips coming up to less traveled destinations that should prove interesting (to write about and to read–I hope). For example, were you aware that there is a national SPAM Museum.

My friend, John (of Michigan-Ford Museum, and New Orleans-World War II Museum trips “fame”) has been bugging me to visit the SPAM “canned ham” museum in Austin, Minnesota.  Acknowledging that he has patiently put up with trips to various aircraft museums, etc., I should probably relent since this is of particular interest to him.

Besides, there is a hidden goal for me—just a little farther up the road is Copper Harbor, Michigan. It is of interest to me, because it is located at the northern end (terminus) of US Rt 41. This route runs by my place in Tennessee and continues all the way south to Miami, Florida. Apparently, this was the route notorious gangster Al Capone used when traveling between Chicago and Miami. In any case, once we complete this trip, I will have traveled US Rt 41 from end-to-end.

Also, there is a lighthouse at Copper Harbor—another for my collection of lighthouse photographs. I anticipate this trip will provide content for at least two blogs, maybe more.

1965 Shasta Camper

The trip is planned for mid-to-late May. In preparation for this trip, I am going to fix up our 1965 Shasta camper—the “Mudflap Motel”—with a new propane gas system for the gas stove, new plumbing, better mattresses, etc. I intend to describe that project in one or more upcoming posts.

So, before we (you) get to see the museum, there will be other preparatory blogs, plus blogs on other topics.

Posted in Uncategorized | Tagged , , , , , , | Leave a comment

Raised Garden – 2020

I love a garden, but I am a lazy gardener. Too often, I have laid out and planted an area that was too large to keep up and had no time to do anything else.

With this in mind, I went through a decision process with the objective of having a manageable (by my standards) garden that would produce what I wanted.

The 2020 Raised Garden

The first option was simply a smaller garden spot. I made tentative arrangements for my neighbor to plow a small area I had laid out in a section of our front yard. We are fortunate enough to have enough room to make this plan work, and in fact, have had such gardens in the past.

Still, I was not settled on “plowing” in the yard. Using a tractor to plow creates tractor tire track damage to the areas outside of the garden as the tractor is maneuvered in the process of plowing.

Meanwhile, over the past several years, I have had two small raised beds in which I grow asparagus and flowers.

Then it dawned on me, make the entire garden of raised beds. I had seen photos of several such gardens, and I like the way it was possible to have vegetables growing in a nicely managed area with grassy paths between the raised beds.

The objective was simple, “raised” garden beds. This would make it easy to care for, provide for our favorite vegetables and herbs, and, if I decided I did not like it, I could return it to full lawn status within the next growing season, and no one would ever know there had been a vegetable garden there.

With this in mind, landscaping timbers could be used to enclose the raised beds—they did not have to be that deep—simply well-defined and deep enough for four or five inches of topsoil. I laid out a rough plan. To simplify the design, I started with standard 8 ft. landscaping timbers. I could easily cut several timbers into 4 and 2 ft. lengths to build the different sized beds. This enabled me to create a materials list.

The Landscaping Timbers

My basic design consisted of rectangles that were eight feet long and four feet wide. This meant that I could tend each bed standing outside the bed. For variety, I could also have beds that were four feet square and two feet wide by eight feet long for several row crops I wanted.

Note how the ends of the timbers are arranged in the photos below—top timbers overlapping the ends of the lower timbers. This allowed me to drill a hole through both timbers and slide a pike through the holes to secure the corners without permanently nailing them together. It also turned out that I needed only one spike per corner.

The Basic Layout of Timbers – Note Overlap at Cornres
Eight-Inch Spike Through Overlapping Corners of Each Bed

I laid out the basic plan on paper to experiment with arrangements of beds and to double-check the number of landscaping timbers and bags of soil I would need. I also experimented with the layout of the beds. This was going to be in the middle of the yard and I wanted it to be interesting as well as functional.

I started with a basic bed that was 4 feet by 8 feet. This plan required six landscaping timbers; two timbers cut in half (four ft. lengths). Each bed was about six inches deep.

As you can see, I made several different shapes of beds, partly because I had specific plans for the long narrow beds, and the diamond shaped beds just to add a little to the garden layout, and provide space for a chair or two within the layout. Clearly you could arrange these beds in any manner that fits your yard to make the best use of space or to take advantage of design potential. Locations in the yard that receive full or maximum sun are important for best growth of most plants.

Note that bed number 1 above, was for climbing green beans. The two timbers on the ground were used to make a trellis. I nailed two cross pieces to these timbers and attached chicken wire to form the trellis. Then dug holes for the posts to erect the trellis. It worked well, except, next year I am going to try panels of wood lattice rather than chicken wire. The wire tended to sag under the weight of the bean vines.

Before I began assembling the beds, I mowed the area with the mower set to cut existing grass as short as possible. Once all the timbers were in place, I filled each bed with inexpensive bagged topsoil. I put the topsoil on the grass—I wanted garden plants to have access to the soil below the bed. Also, I mixed in several cups of fertilizer as I filled each bed with topsoil.

I filled each bed with about four inches of top soil.

Incidentally, in a rare instance of planning ahead, the space between each bed was measured so that my push mower would fit between the beds, making it easier to keep the grassy paths neat. This spacing also made it easier to care for and tend plants, remove weeds, and harvest vegetables. The results can be seen in the photos at the beginning of this post.

Lessons Learned

Squash, cucumbers, and zucchini are likely to grow well beyond the boundaries of a bed 4 feet wide. I may add or rearrange the beds and include a couple of 8 x 8 ft beds for these plants. I had one hill each of these plants and had plenty of squash, cucumbers, and zucchini for us.

Incidentally, the okra, in bed 5, were best plants I have ever had, some of them more than twelve feet tall.

Also, as plants ceased to be productive, I cleaned out the beds. Several of the beds were bare by the time we planned our annual “Fall Fest” Family Reunion, which normally involves about 60 people. I planted mums, ornamental cabbages, and other fall flowers in the cleared beds to add a bit of color, extending the useful season of the beds.

Posted in Uncategorized | 1 Comment

Why I am the Digital Age’s Equivalent of Indiana Jones

Oh, there are differences, of course—he trained in history, ancient cultures, and archeology; I trained in biology, aeronautics, writing, and digital communications (okay, a word processor), but we are both writers in our respective fields.

“It was his father who had been the archetypal archeologist, digging, discovering, and writing as necessary to document his finds for the rest of the archeological community. With some disdain, Henry Jones senior says to Indiana1, ‘you write books,’ as if he were not a true archeologist.”2

I have worked with many “Henry Jones seniors” who work hard at digging through the bits and bytes of technology to unlock the next “big thing.” When they finally discover or invent that new algorithm or process, they may promptly write a scientific or journal paper on the topic, suitable for reading only by other highly technically focused minds that are capable of understanding the intricacies of the technology.

As a technical and proposal writer, it has been my job to research and nominally understand these new technologies enough to write about them—intelligently—so that curious, literate readers could appreciate what this new “process” had to offer (without having to understand the “bits and bytes”).

Much of my professional career has involved writing technical proposals for major companies focused on research and development. The research engineers could speak eloquently of formulas, processes, structures, etc. The fact is, though, the decision makers in government and industry that use the technologies are not necessarily adept at realizing the why, how, and the potential benefit of these new technologies (they do have technically astute advisors). It is not due to any lack of intellect or poor reading skills. Their roles are business and strategic thinking. Give them tools that work, and they will convert them into strategic or tactical business successes.

Enter the technical writer—at least in my role: my job was to be able to understand the technology enough to explain it and to bridge the gap between the technology-focused engineer and the astute business person so she or he could see it as an opportunity to solve a problem, overcome a challenge, or improve a process (and be a sound business—or strategic—investment).

Often my assignments involve research into the digital archives of the World Wide Web that must first be located, studied, and if applicable, “dusted off,” and written about.

So, I am sort of like Indiana Jones, searching for nuggets of technology—only my “digs” are digital; oh, and I don’t carry a whip.
____

1 Indiana Jones, Film Character, Lucas Films (The Walt Disney Company)

2Judith Weinraub, Umberto Eco His Complex Design, The Washington Post, November 26, 1989.

Bullwhip Image: Colorado Saddlery – The Supreme Bull Whip (Amazon.com)

Posted in Uncategorized | Tagged , , | Leave a comment

Angina – An EECP Update

In the summer of 2017, I was diagnosed with angina (angina pectoris), pain in the chest caused by restricted blood flow to the heart during periods of exertion. The original series of three  posts covered the diagnostic procedures, an explanation of angina, and finally, treatment using Enhanced External Counter Pulsation (EECP) (https://reninassancemusings.wordpress.com/2017/05/07/angina-from-detection-to-treatment-part-1/).

At the time, the doctor explained that the treatment should last three to five years before symptoms of angina returned.

Since it has been about three and a half years since the treatments, I thought it worthwhile to report on my current status.

I am pleased to report that I have not yet had any recurrence of symptoms of angina.

I have made some basic changes in my life, but nothing drastic. First, I have lost 30-plus pounds and am now down to what my doctor says is a normal, healthy weight. Weight lost was achieved through two actions: (1) a healthy, essentially keto, diet and (2) regular exercise, largely based on walking regularly.

Minimum walking distances most days is at least 2.5 miles (about 5,000 steps). I try to get in as many as 10,000 steps one or two days a week. I look for ways to incorporate walking into daily activities. For example, rather than using the riding lawnmower for all the yard, I use a walk-behind (powered) push mower. When the grass does not need mowing, I can usually find chores and tasks that will involve walking. It no longer upsets me when I forget a tool and I have to walk back across the yard to get it.  I also take walks around the neighborhood if I cannot find something specific to do. As a last resort, or in the case of bad weather, I do have a treadmill.

I use a Fitbit watch to record daily steps. I keep a daily record that includes weight, morning blood pressure, and steps.

Periodically, every year or two, my cardiologist puts me through a stress test that amounts wiring me to an EKG machine and having me walk on a treadmill at increasing speeds and inclines. He is looking at my pulse and blood pressure, both how high the values are at maximum exertions, and how quickly these numbers come back down to resting state values. And, of course, to see if I am having any symptoms of angina. So far, so good.

I am told that I can repeat the EECP treatments as frequently as once a year, if needed. I will be having my next stress test later this year.

Posted in Uncategorized | 5 Comments

Personal Trifecta

It began like this.

Early in the year, I learned that the US Air Force Museum was going to unveil the Memphis Belle B-17 exhibit in early May. I called my friend, John (of Michigan and New Orleans trips “fame”), and we began to make plans for the trip to Dayton, Ohio. Of particular interest were the three other B-17s that were going to fly in for the unveiling.

During initial planning, I realized that my manager for my ongoing writing job as editor for the Velocity News, Reiff, lives in the Dayton area. I contacted him, and explained our plans, and before I could say anymore, he promptly invited us to see his “83%” XL-RG (N142AZ). He also said we might be able to visit another builder that lived nearby.

The Velocity is a unique composite (fiberglass-plus) “home built” aircraft with more than 300 either built or under construction. Most of the owners and builders belong to their association, the Velocity Owners and Builders Association.

Velocity-Aircraft_large

The Velocity is pusher/canard kit-built aircraft. (Photo: Velocity Aircraft)

Leg One of My Trifecta — B-17s

Days One and Two in Ohio were spent at the USAF Museum. John and I witnessed a formation of three B-17s and five P-51s much as it must have looked on a bombing run over Europe in 1943. They did not land because the weather outlook suggested they might not be able to take off again. On Day Two, the Memphis Belle exhibit was unveiled, the B-17s were able to come in and land, and we got to walk through two of the B-17s on the flight line.

zB-17s May 16, 2018 (900x602)

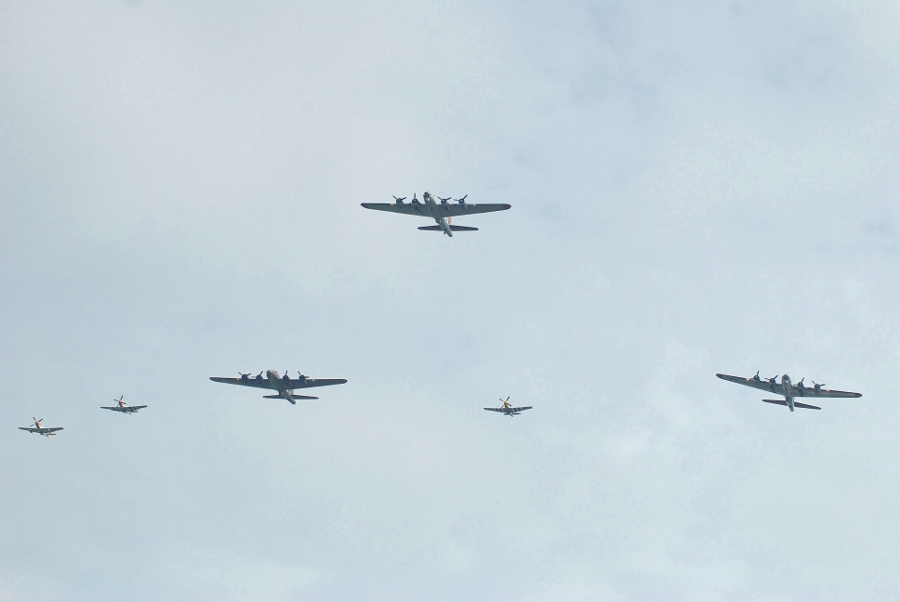
The initial reason for our visit to the Dayton Area—the unveiling of the Memphis Belle exhibit celebrated by three of the currently 12 flying B-17s.

20180517_115535

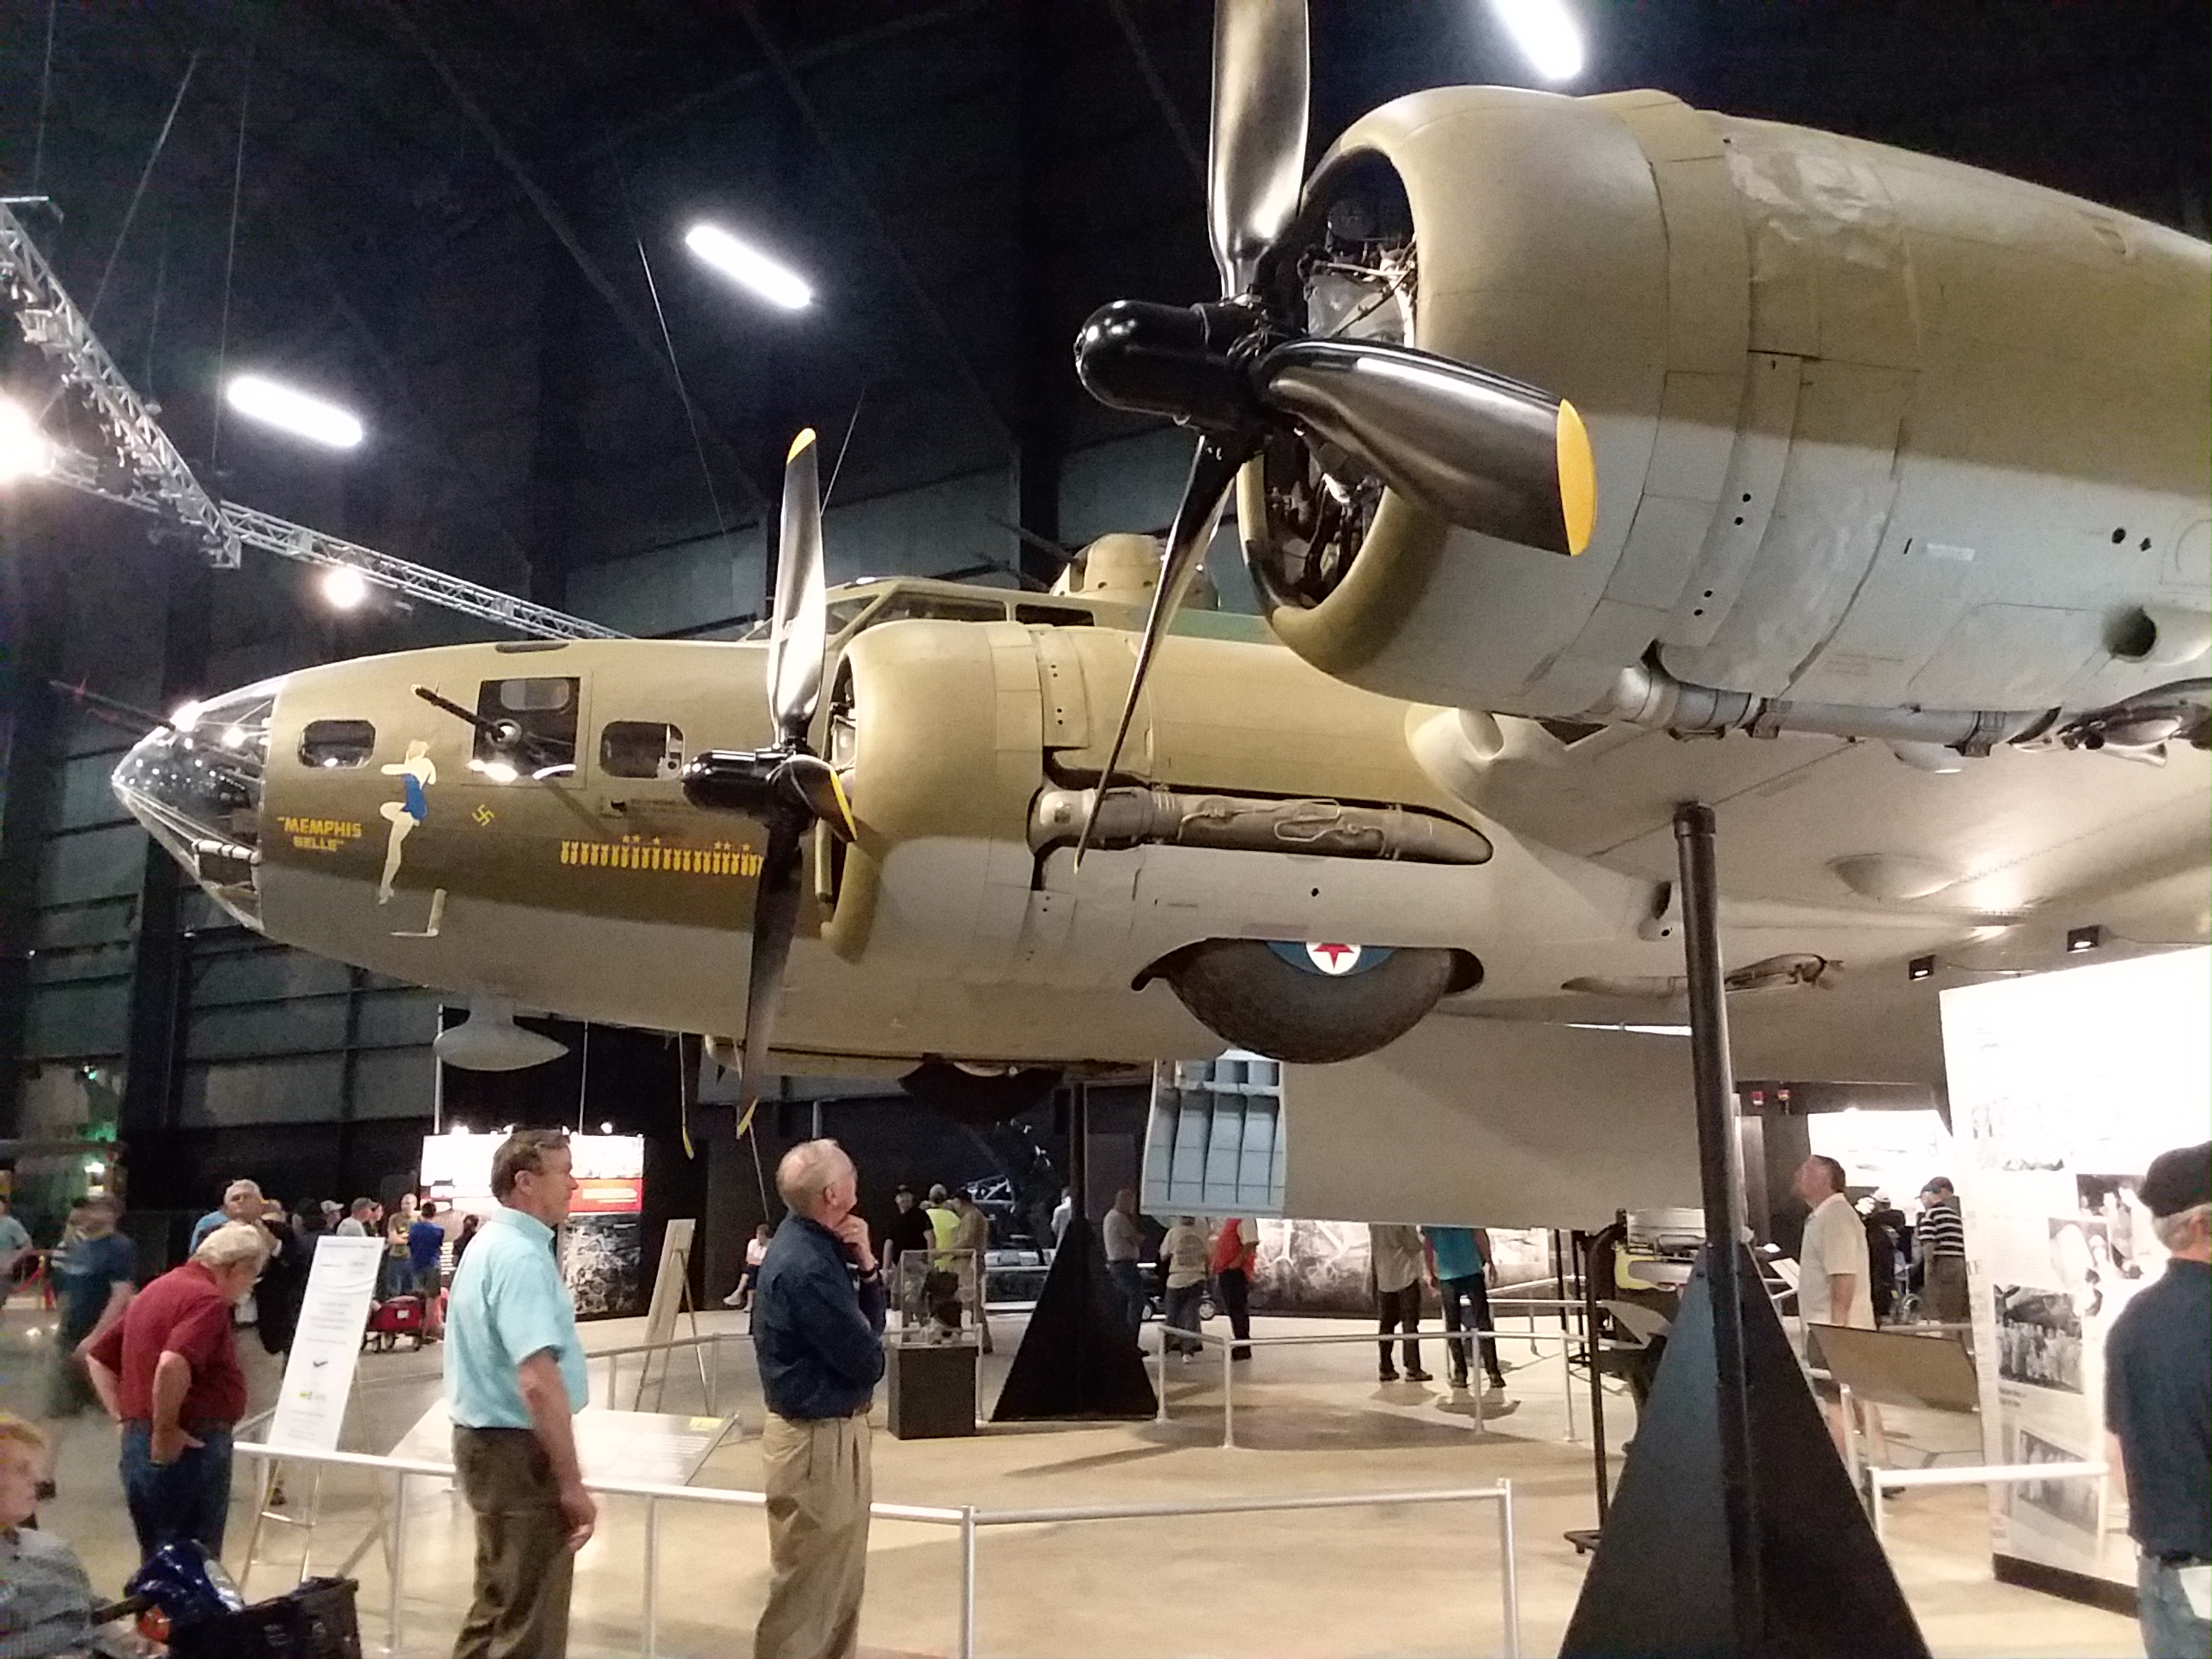
The Memphis Belle on Display at the USAF Museum

20180517_135048

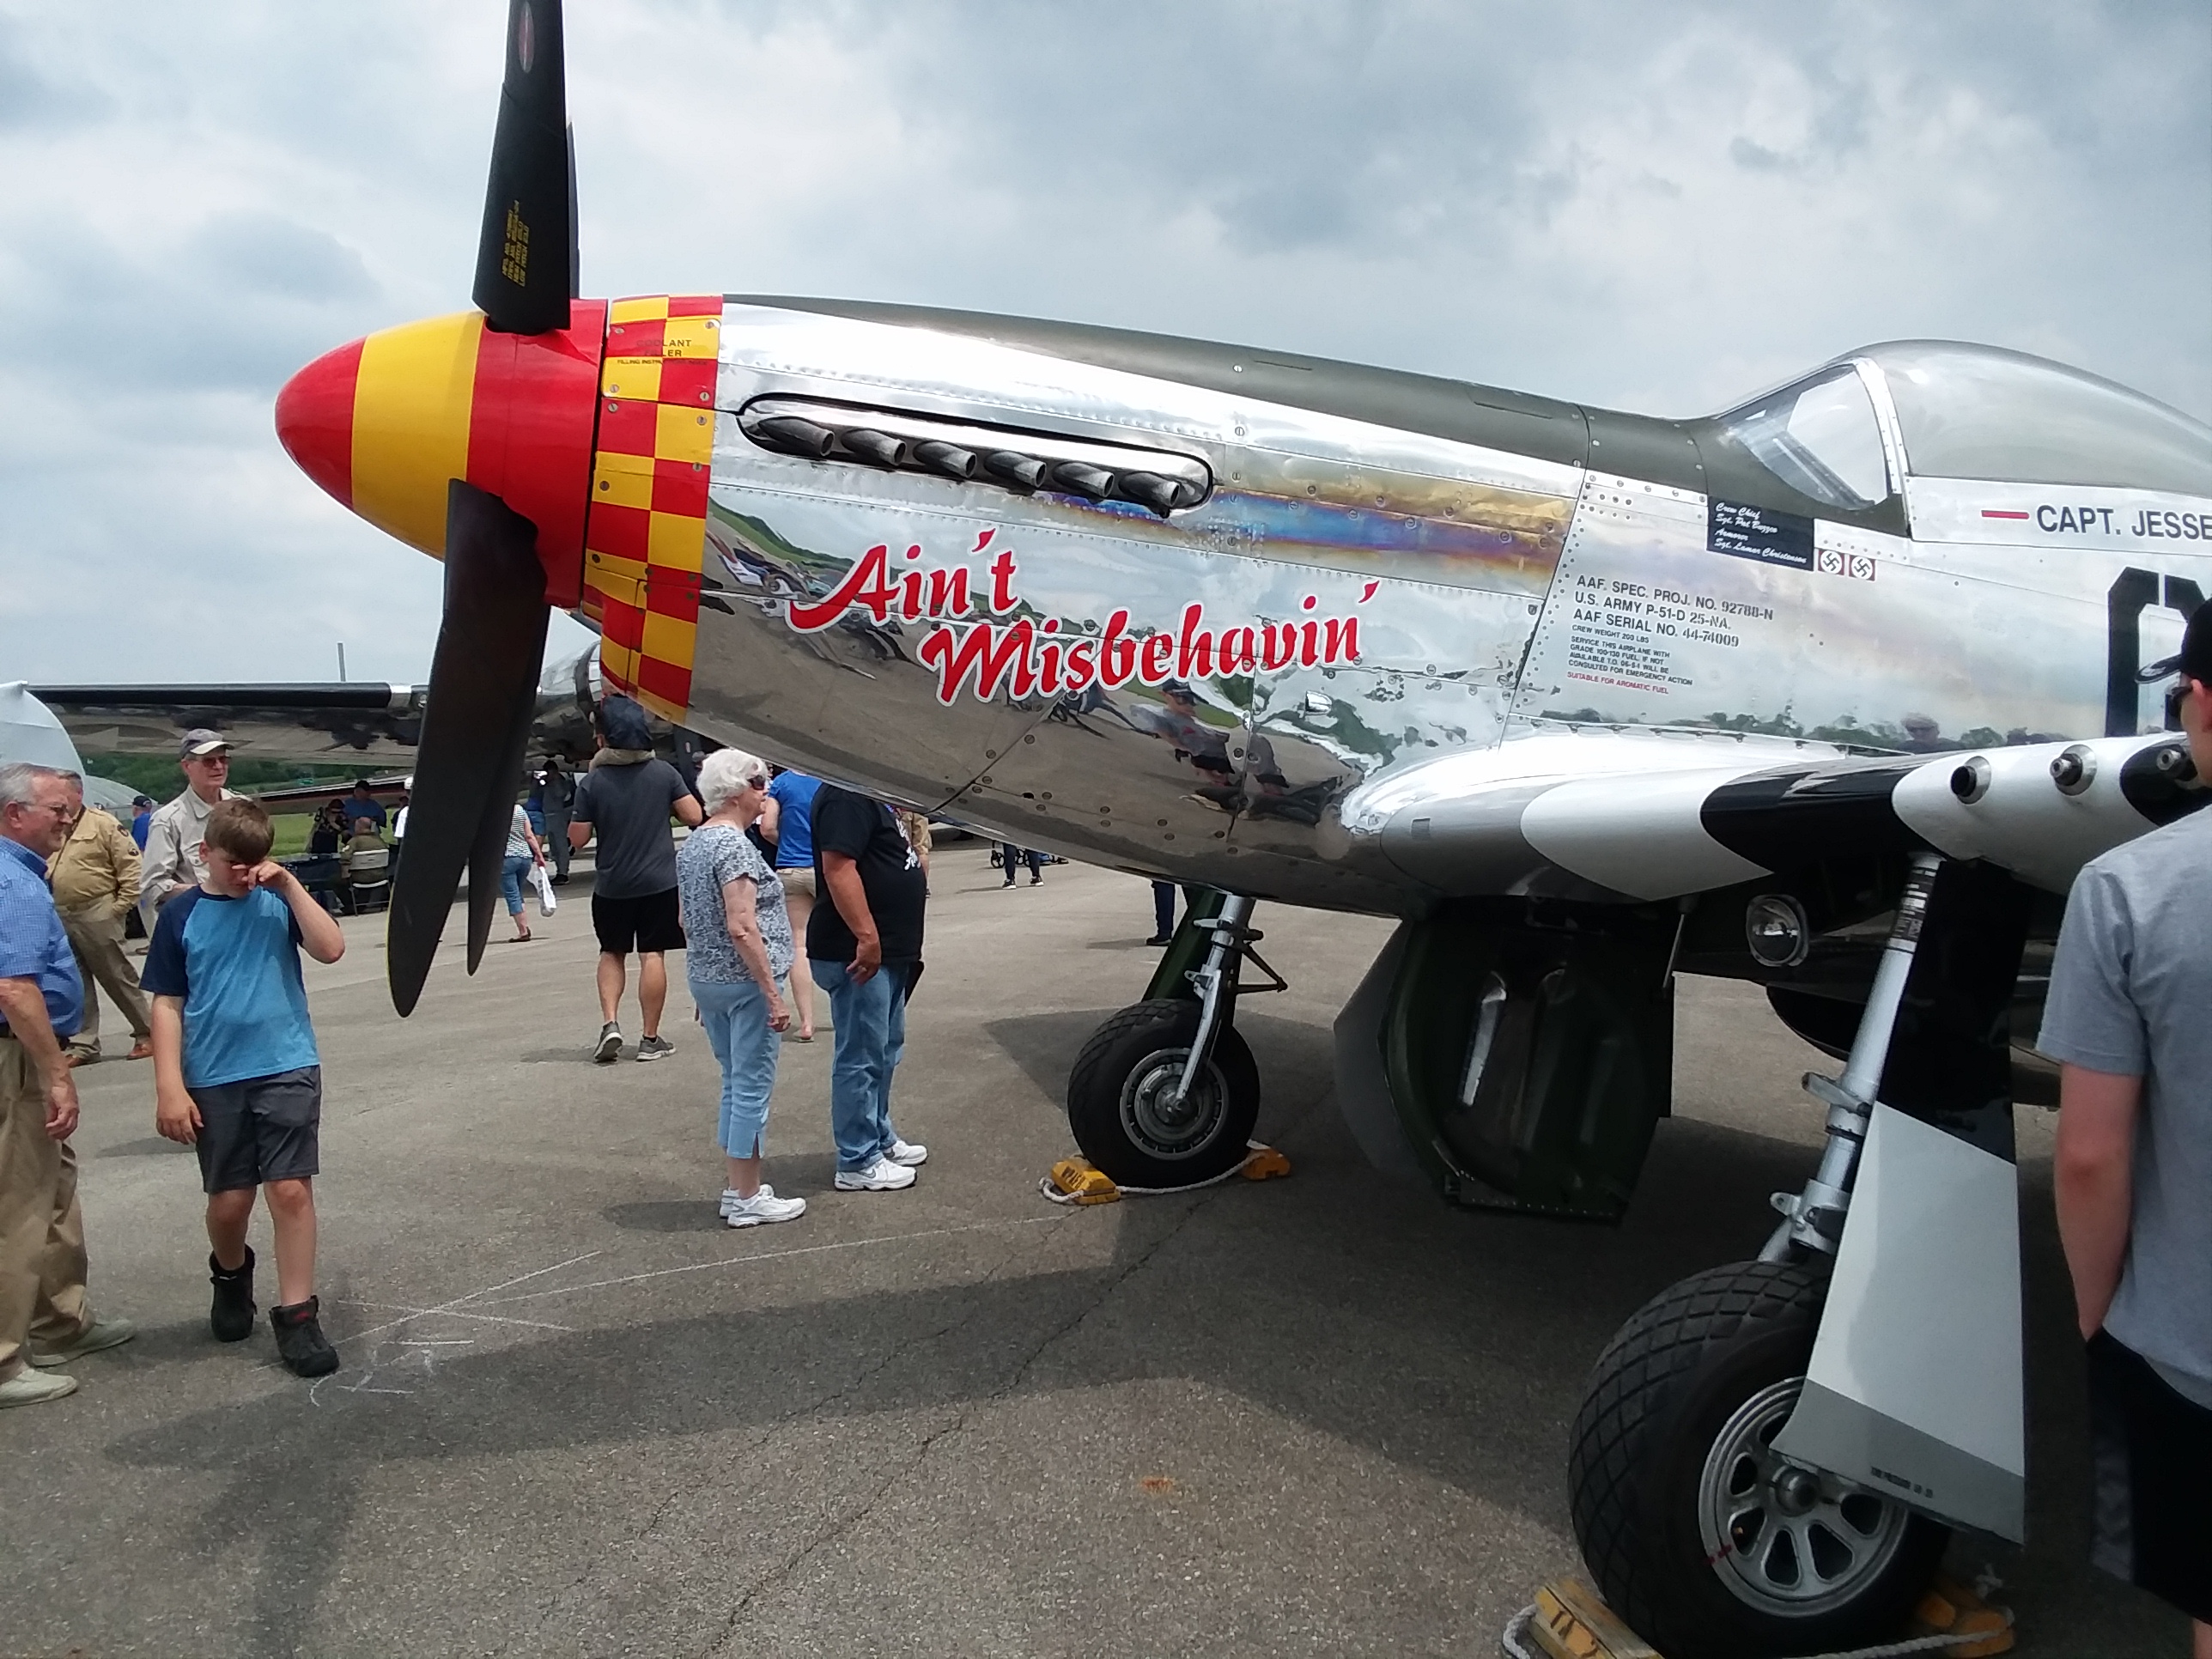
One of the five P-51 Mustang aircraft that participated in the B-17 fly-over.

Leg Two of the Trifecta

Early Friday morning we drove over to Reiff’s home. He greeted us and opened the garage door, revealing his “83%” Velocity XL-RG (many builders post and update their estimate of how near completion they are—Reiff feels he is “83%” to completion. “XL” indicates extra-large cabin, “RG” indicates retractable landing gear). We spent the next two hours going over the aircraft. Reiff guided us through many of the features and unique aspects of the Velocity, showing me many of the features of the aircraft we have been writing about.

Reiff and N142AZ-1 (900x602)

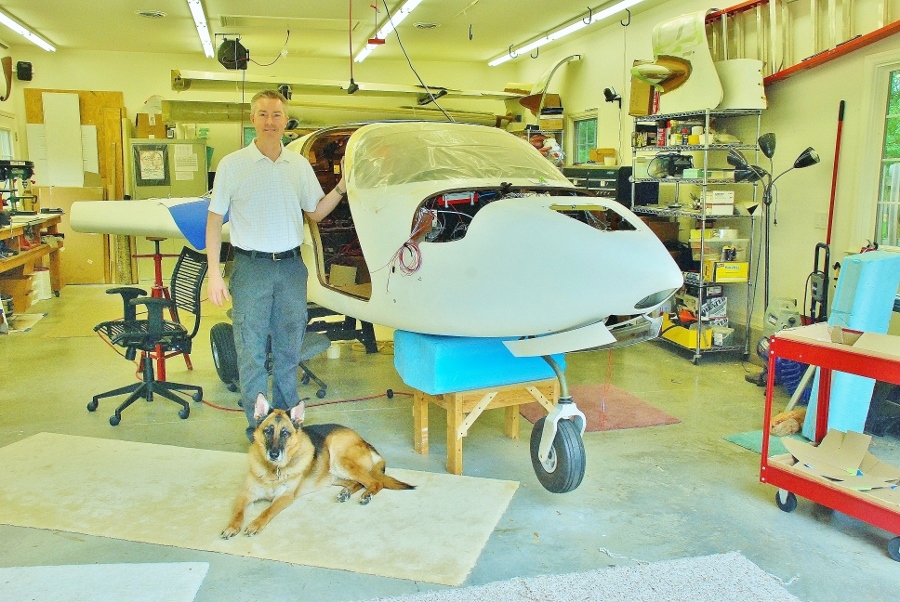
Reiff greeted us in his garage.

Reiff and N142AX-2 (2) (900x602)

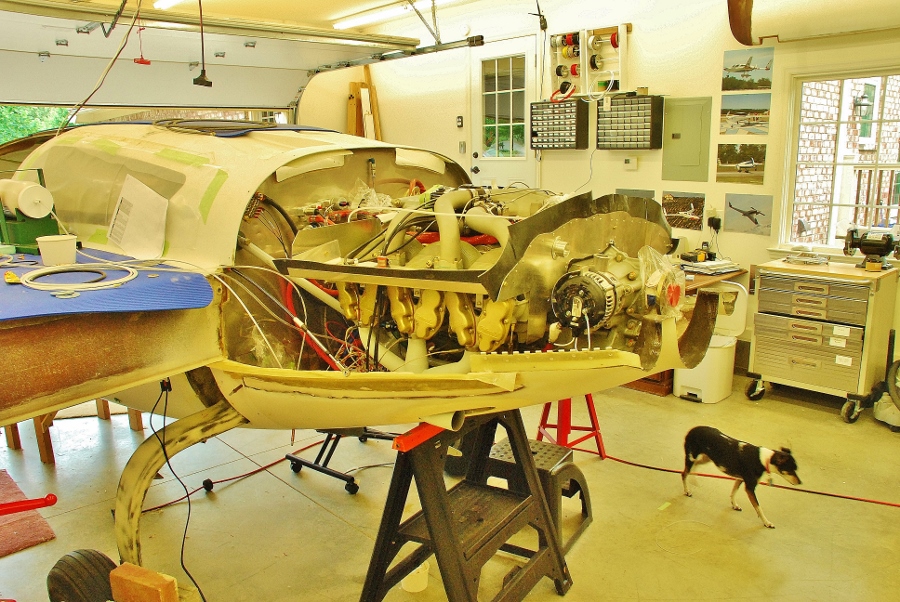
The engine is mounted on the rear of the aircraft—a “pusher” aircraft.

Later that morning we drove to the home of Jerry and Linda who are well into the construction of their XL-RG. They were preparing to cut and fit the metal firewall in the engine compartment.

Like most tasks, before you do anything, you have to do something else first. In this case, it was to remove the right wing, move “stuff” around the shop floor, and reposition the aircraft to make room for the “cutting table.”

After lunch, the work began.

What followed looked like finely-honed teamwork: Jerry driving the nibbler (metal cutter), Linda guiding the vacuum to pick up bits of cut metal, and Reiff steadying the sheet of metal. Within a matter of minutes, the firewall was cut, and ready for fitting. The afternoon was declared a success, and we returned to Reiff’s home.

Brainard-N202VB-3 (900x602)

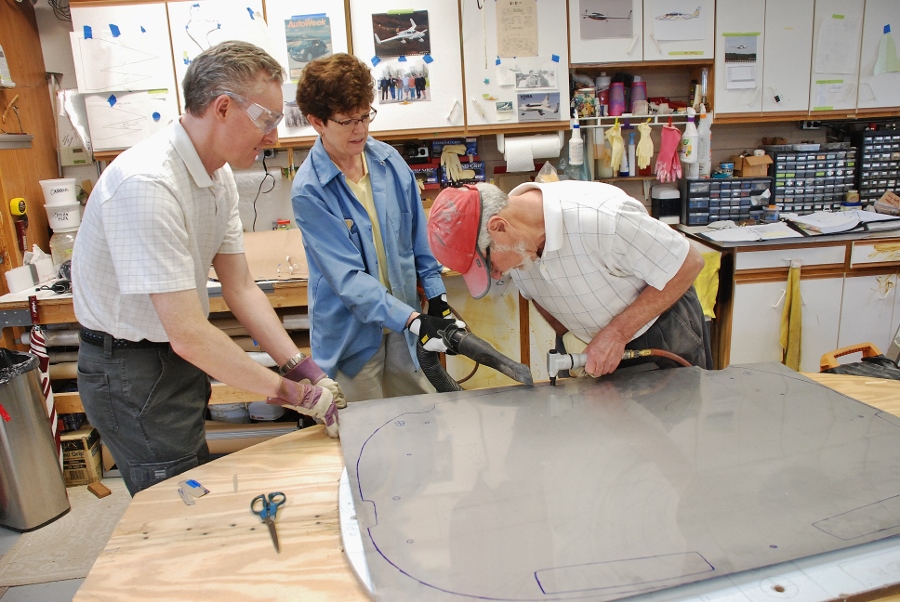
Reiff steadies the firewall material while Linda vacuums metal chips from Jerry’s metal cutter.

Of course, for pilots, at least, nothing is better (well almost) than talking about, or working on, airplanes, unless, of course you can go flying. To top off the second leg of my trifecta, Reiff drove us out to Dayton Wright Brothers Airport (KMGY) for a demonstration flight in N44VF.

There I was…

DSC_0476 (900x602)

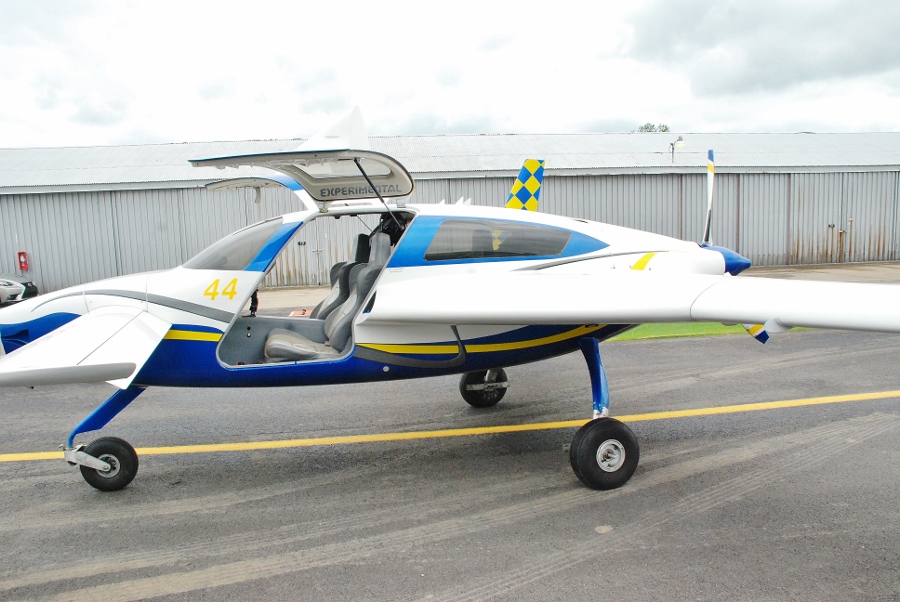
Our ride, Velocity N44VF

Unfortunately, the ceiling was only high enough to get up to pattern altitude, and the air was anything but smooth. Reiff offered me some stick time, but the bumpy conditions were such that I would not have been able to really get a good feel for the aircraft’s controls. Still, the ride was a great experience and I will be looking for another opportunity.

DSC_0486 (900x602)

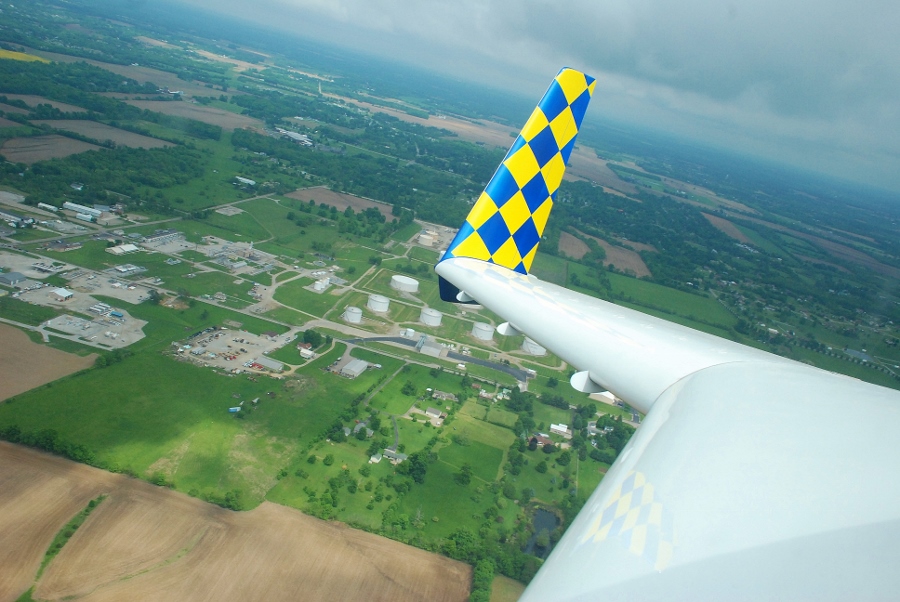
The iconic Velocity over-the-shoulder shot of a winglet/rudder!

Velocity Reiff and Jeff

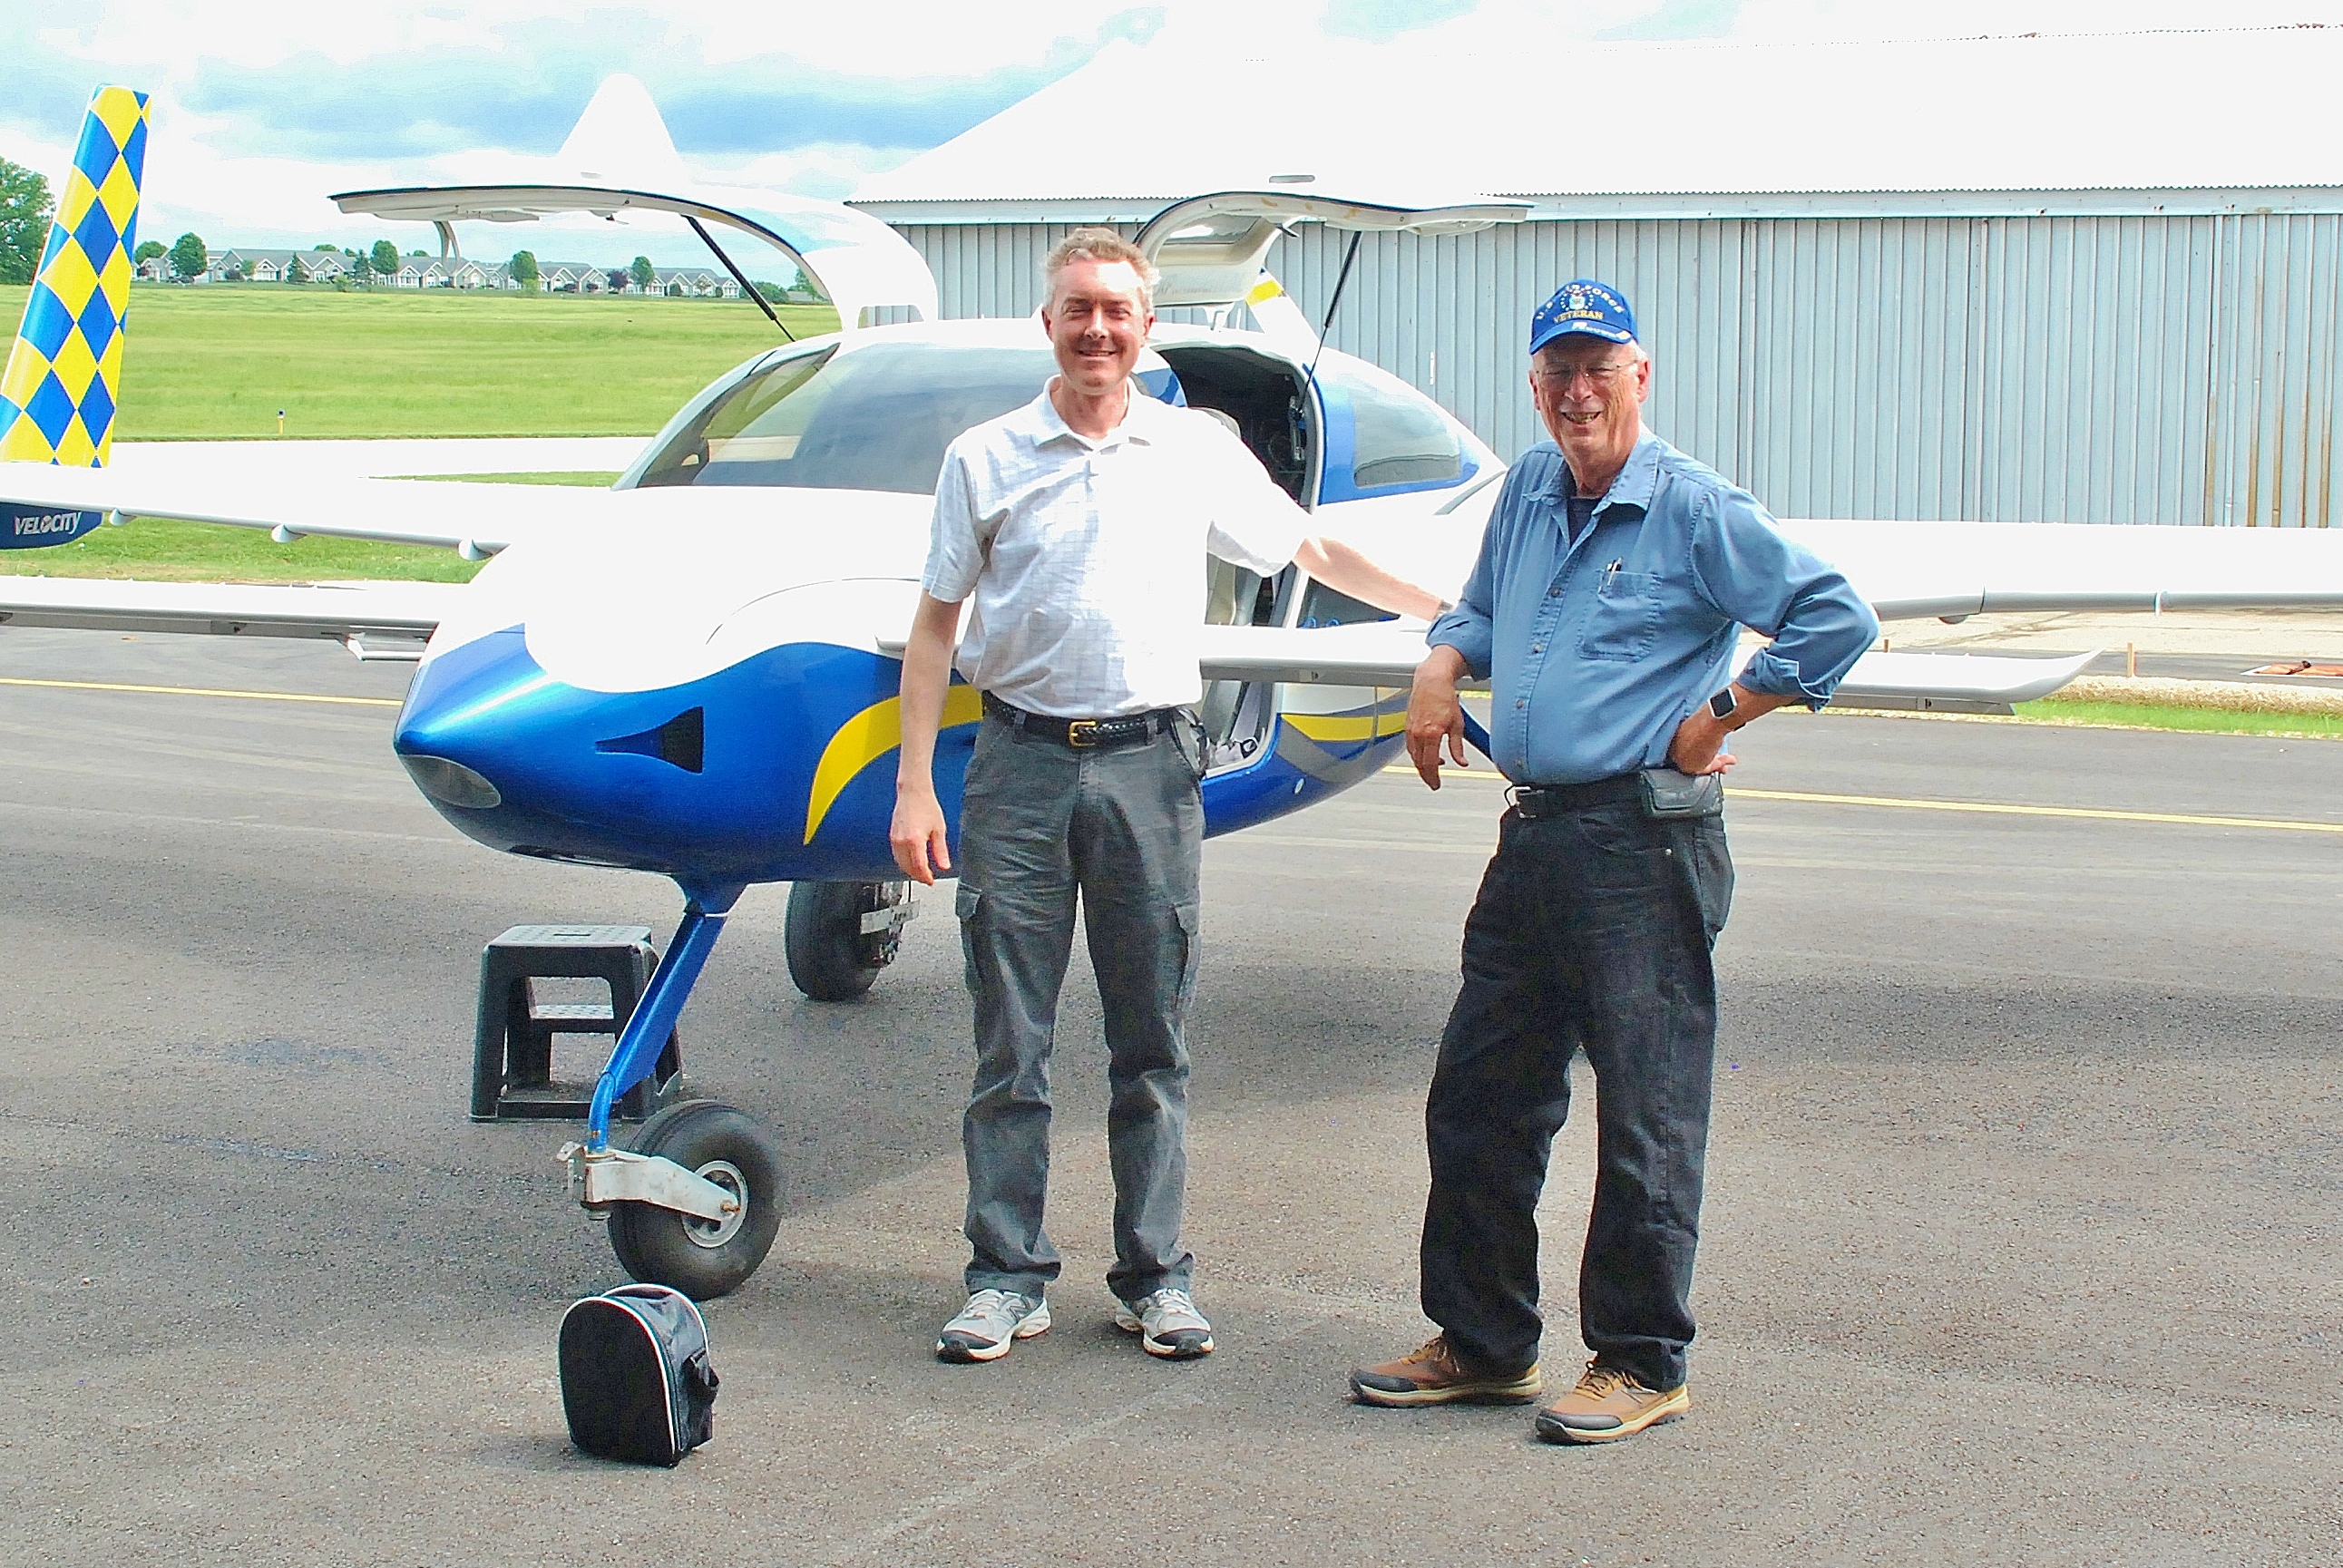
Reiff and I standing in front the aircraft we had just flown.

To top off the day, Reiff had scheduled a dinner in town with five other Velocity couples, but before dinner, we had to mount the base for his ELT in the nose of his aircraft. This, like many smaller tasks, is not difficult, if you have an extra set of hands available to hold things in place.

Dinner was excellent, but most of all, I enjoyed listening to all of the experiences and plans of those who were flying or still building their Velocities. It was a great end to a great day.

A note about the Velocity: the aircraft is typically built from a kit. Anyone may build a kit aircraft, but it does have to pass an FAA compliance inspection before an airworthiness inspection will be issued so the aircraft can be flown. All home-built and kit-built aircraft must registered as ‘EXPERIMENTAL” aircraft.

Leg Three of the Trifecta

Late last year, out of the blue, as they say, I received an email from my freshman year college roommate, Chip. Over those first two semesters we had become good friends, even going to the New York’s World’s Fair, which was not far from his home in New Jersey.  At school, he and I were on entirely different academic tracks, so we had no classes together. The next year I was able to obtain a room off campus, and after that, I did not see Chip often. One afternoon, I learned that he had left the college. The circumstances were not clear, and there was no explanation, but the fact is, I never heard from Chip again. Now, nearly 50 years later, I received his email. The key piece of information I learned, relative to this post, was that he too lived in Ohio, only a couple of hours away from Dayton.

As I began making plans for the trip to Dayton, I sent him a note and let him know what we were doing and that he might be close enough to meet us there. He did, and we met, again for the first time in a long time on Thursday at the Air Force Museum. We walked, talked, and looked at everything, watched the B-17s fly over again, and went out to the flight line to tour the aircraft—all the time talking about what we had been doing over the years.

Later that evening, Chip came over to our campsite to share a drink, and wide-ranging conversation that lasted well into the night. And I did learn why he left college—he was not happy with some of the most conservative—and deep seated—attitudes of the college staff, and vocally conveying his ideas to the president resulted in a mutual agreement that he might be happier somewhere else. Nearly a half century later, we are back in touch.

For a person with my interests—airplanes, friends with airplanes, and just plane (Freudian typo) long-lost friends—to score big in all areas on one short-notice trip was truly a trifecta event for me.

Posted in Aircraft of the Month, Renaissance Bucket List, There I was..., travel | Tagged , , , , , , , , , , , , , , | 2 Comments