I love a garden, but I am a lazy gardener. Too often, I have laid out and planted an area that was too large to keep up and had no time to do anything else.
With this in mind, I went through a decision process with the objective of having a manageable (by my standards) garden that would produce what I wanted.
The first option was simply a smaller garden spot. I made tentative arrangements for my neighbor to plow a small area I had laid out in a section of our front yard. We are fortunate enough to have enough room to make this plan work, and in fact, have had such gardens in the past.
Still, I was not settled on “plowing” in the yard. Using a tractor to plow creates tractor tire track damage to the areas outside of the garden as the tractor is maneuvered in the process of plowing.
Meanwhile, over the past several years, I have had two small raised beds in which I grow asparagus and flowers.
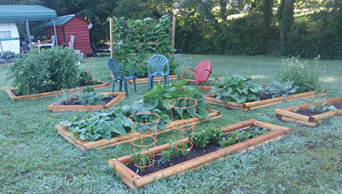
Then it dawned on me, make the entire garden of raised beds. I had seen photos of several such gardens, and I like the way it was possible to have vegetables growing in a nicely managed area with grassy paths between the raised beds.
The objective was simple, “raised” garden beds. This would make it easy to care for, provide for our favorite vegetables and herbs, and, if I decided I did not like it, I could return it to full lawn status within the next growing season, and no one would ever know there had been a vegetable garden there.
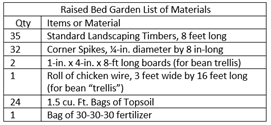
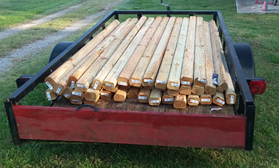
With this in mind, landscaping timbers could be used to enclose the raised beds—they did not have to be that deep—simply well-defined and deep enough for four or five inches of topsoil. I laid out a rough plan. To simplify the design, I started with standard 8 ft. landscaping timbers. I could easily cut several timbers into 4 and 2 ft. lengths to build the different sized beds. This enabled me to create a materials list.
My basic design consisted of rectangles that were eight feet long and four feet wide. This meant that I could tend each bed standing outside the bed. For variety, I could also have beds that were four feet square and two feet wide by eight feet long for several row crops I wanted.
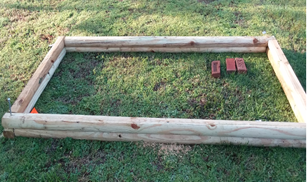
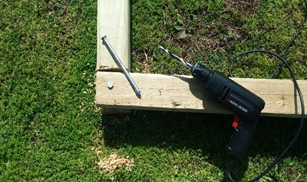
Note how the ends of the timbers are arranged in the photos below—top timbers overlapping the ends of the lower timbers. This allowed me to drill a hole through both timbers and slide a pike through the holes to secure the corners without permanently nailing them together. It also turned out that I needed only one spike per corner.
I laid out the basic plan on paper to experiment with arrangements of beds and to double-check the number of landscaping timbers and bags of soil I would need. I also experimented with the layout of the beds. This was going to be in the middle of the yard and I wanted it to be interesting as well as functional.
I started with a basic bed that was 4 feet by 8 feet. This plan required six landscaping timbers; two timbers cut in half (four ft. lengths). Each bed was about six inches deep.
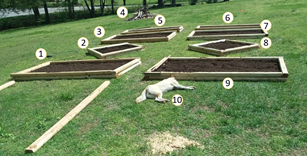
As you can see, I made several different shapes of beds, partly because I had specific plans for the long narrow beds, and the diamond shaped beds just to add a little to the garden layout, and provide space for a chair or two within the layout. Clearly you could arrange these beds in any manner that fits your yard to make the best use of space or to take advantage of design potential. Locations in the yard that receive full or maximum sun are important for best growth of most plants.
Note that bed number 1 above, was for climbing green beans. The two timbers on the ground were used to make a trellis. I nailed two cross pieces to these timbers and attached chicken wire to form the trellis. Then dug holes for the posts to erect the trellis. It worked well, except, next year I am going to try panels of wood lattice rather than chicken wire. The wire tended to sag under the weight of the bean vines.
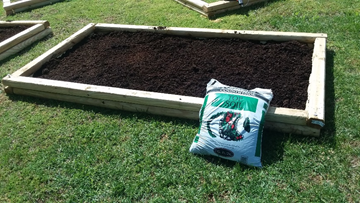
Before I began assembling the beds, I mowed the area with the mower set to cut existing grass as short as possible. Once all the timbers were in place, I filled each bed with inexpensive bagged topsoil. I put the topsoil on the grass—I wanted garden plants to have access to the soil below the bed. Also, I mixed in several cups of fertilizer as I filled each bed with topsoil.
Incidentally, in a rare instance of planning ahead, the space between each bed was measured so that my push mower would fit between the beds, making it easier to keep the grassy paths neat. This spacing also made it easier to care for and tend plants, remove weeds, and harvest vegetables. The results can be seen in the photos at the beginning of this post.
Lessons Learned
Squash, cucumbers, and zucchini are likely to grow well beyond the boundaries of a bed 4 feet wide. I may add or rearrange the beds and include a couple of 8 x 8 ft beds for these plants. I had one hill each of these plants and had plenty of squash, cucumbers, and zucchini for us.
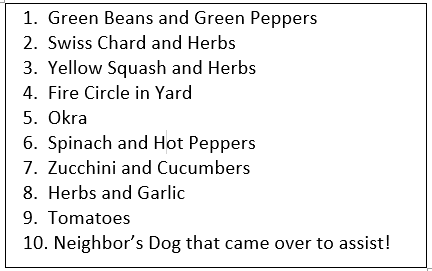
Incidentally, the okra, in bed 5, were best plants I have ever had, some of them more than twelve feet tall.
Also, as plants ceased to be productive, I cleaned out the beds. Several of the beds were bare by the time we planned our annual “Fall Fest” Family Reunion, which normally involves about 60 people. I planted mums, ornamental cabbages, and other fall flowers in the cleared beds to add a bit of color, extending the useful season of the beds.

Great to see you back around, Merlin.